Smart Timely

How to Integrate Zoom with SmartTimely

Follow these step-by-step instructions to seamlessly connect Zoom with SmartTimely and automate your online meetings:

Access the Zoom Marketplace

  • Visit the official Zoom Marketplace at https://marketplace.zoom.us/.
  • Click the “Sign In” button in the top-right corner and log in to your Zoom account.
  • Once signed in, go to the “Develop” section in the navigation menu and select “Build App” from the dropdown menu.

Create a Server-to-Server OAuth App

  • Choose “Server-to-Server OAuth App” as your app type.
  • Give your app a name of your choice

Copy App Credentials

  • After creating the app, Zoom will provide your App Credentials (Account ID, Client ID, and Client Secret).
  • Copy these credentials, as you’ll need to add them to the SmartTimely settings.

Complete App Information

  • Click “Continue” and fill out the required information for your app.
  • Ensure the details are accurate to maintain professionalism and enable proper functionality.

Skip the "Features" Step

  • No specific action is required in the “Features” step. Click “Continue” to proceed.

Add Required Scopes

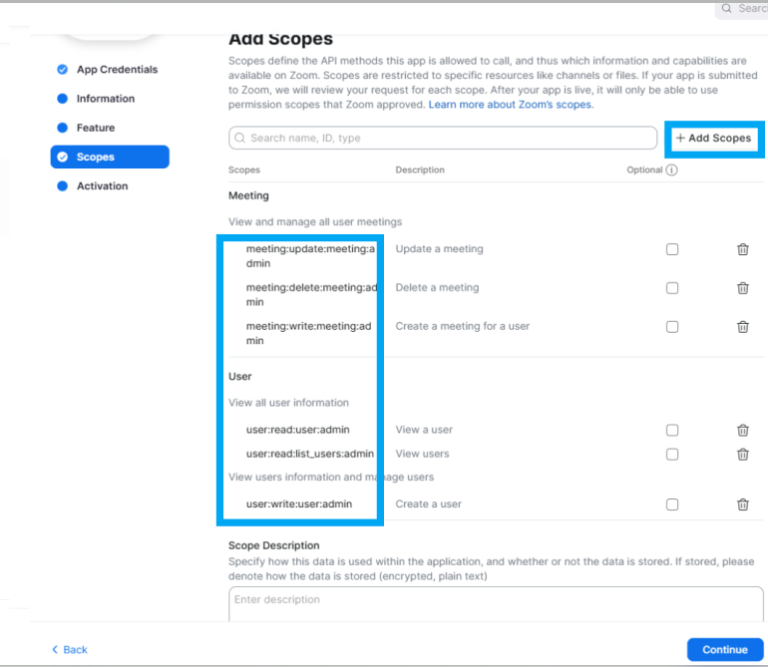
  • Scopes define the permissions your app needs to interact with Zoom. Add the following scopes for your integration:

    After adding the necessary scopes, click “Continue” to proceed.


    Meeting:

    meeting:write:meeting:admin

    meeting:update:meeting:admin

    meeting:delete:meeting:admin

    User:

    user:read:user:admin

    user:write:user:admin

    user:read:list_users:admin

Activate Your App

  • Click on the “Activate your app” button.
  • Your Zoom app is now activated and ready for use with SmartTimely.

Configure Zoom Integration in SmartTimely

  • Go to SmartTimely > Settings > Integrations and enable the Zoom integration option.
  • Paste your Account ID, Client ID, and Client Secret in the respective fields.

Customize Meeting Settings

  • Fill in the Meeting Topic field. You can use shortcodes for dynamic content in the meeting topic or description. Click the Keywords icon to view available shortcodes.
  • By default, SmartTimely generates random 8-digit passwords for Zoom meetings. You can disable this by turning off the Set random password for meetings option.
  • If you are using the templates from Smarttimely, you can ignore this step

Activate Zoom for Specific Services

  • Navigate to the Service you want to integrate with Zoom.
  • Edit the service and enable the Activate Zoom for this service option

Enable zoom

  • Go to Settings->Integrations-> Zoom and enable it by entering account ID, client Id, and
  • Meeting topic:
    Consultation {customer_full_name} with {staff_name}- {service_name} – {company_name}
  • Description:
    Thank you for booking with us!
    You can join this meeting from your computer, tablet, or smartphone.
    Your meeting link: {zoom_meeting_url}
    {company_name}

Link SmartTimely Staff with Zoom Users

  • Go to SmartTimely > Staff and edit the staff member you want to link.
  • In the Zoom User field (located at the bottom of the edit form), select the appropriate Zoom user and save the form.

That’s It!

Your Zoom integration with SmartTimely is now complete. You’re ready to automate your online meetings and deliver seamless scheduling experiences for your clients.