Smart Timely

Step-by-Step Guide to Setting Up Tracking in SmartTimely

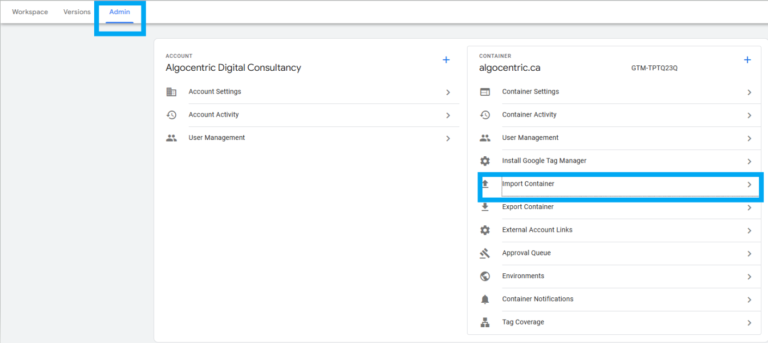
Streamline your tracking setup with SmartTimely! Follow this simple guide to import the GTM (Google Tag Manager) container and configure tracking for Facebook Pixel, Google Ads, and Google Analytics in no time.

Download the GTM Container File

Click on the following link to download the file
https://drive.google.com/file/d/1ZAWq0CGVl5XECfOkqi973NfS7pGd0u_w/view?usp=sharing

Log in to Google Tag Manager

  • Visit Google Tag Manager.
  • Sign in with your Google account.
  • Select the account and container where you want to import the tracking setup.

Import the SmartTimely GTM Container

  • In Google Tag Manager, click on Admin in the top navigation.
  • Under the Container Settings, select Import Container.
  • Upload the downloaded SmartTimely GTM container file.
  • Choose Existing Workspace to overwrite the current setup or New Workspace for a fresh start.
  • Review the changes and click Confirm to import.

Update Your Tracking IDs

  • For Facebook Pixel:

    • Go to the Tags section in Google Tag Manager.
    • Locate the Facebook Pixel tag.
    • Replace the placeholder with your Facebook Pixel ID.
    • Save your changes.
  • For Google Analytics:

    • Find the Google Analytics tag.
    • Replace the placeholder with your Google Analytics Measurement ID (e.g., G-XXXXXXXXXX).
    • Save your changes.
  • For Google Ads:

    • Locate the Google Ads Conversion Tracking tag.
    • Replace the placeholder with your Google Ads Conversion ID.
    • Save your changes.

Publish Your Container

  • Once everything is tested and confirmed:

    1. Click Submit in Google Tag Manager.
    2. Add a version name (e.g., “SmartTimely Tracking Setup”) for future reference.
    3. Publish the container to make your tracking live.